Introduction
Procedure
Getting the Software
Using MapEdit
Saving Your Clickable Map
Server Map
Client Side MAP
Clickable maps are a very easy and convenient way or orienting users on your home page. Just click on an image and go to the desired site!! Here is a short exercise on how to create your own clickable map. To see a cool example, check out Dr. Maidment's home page.
The first thing you need is to download
the software, MapEdit. This will take a few minutes.
Or get it from Dr. McKinney's Class Folder:
Go to the Windows Explorer from the Start/Programs
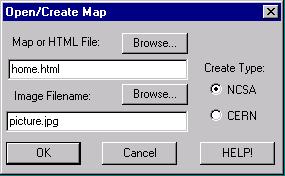
Before you can create a Clickable map, you must have a html document and a figure (your soon to be Clickable "map") incorporated in the document. When you open the MapEdit software, you will be prompted to select an html or map document. Select your html document. Then a new window will appear listing all the images found in that document. Select the figure you want to make Clickable.

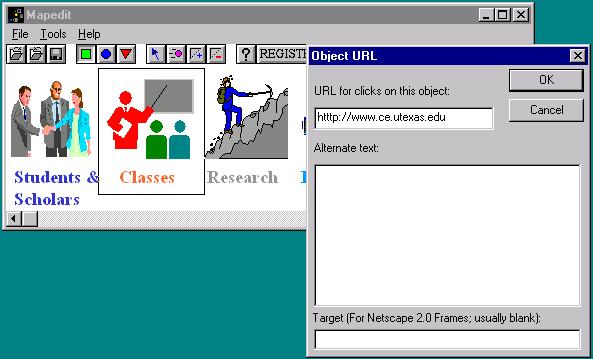
Once you have done that, you will see your image opened in MapEdit.

The next step is to select a portion of your image that you want linked.
You can select area using a square, triangle or circle. ![]() . Click on your desired shape and then select an area by clicking
and dragging on the mouse. Once you let go of clicking the mouse, a new
window appears in which you will be asked the URL to be linked to. Then,
click OK.
. Click on your desired shape and then select an area by clicking
and dragging on the mouse. Once you let go of clicking the mouse, a new
window appears in which you will be asked the URL to be linked to. Then,
click OK.

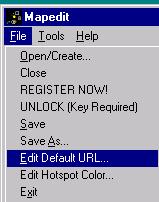
Repeat this procedure until you have linked what is necessary for your image. Finally, make sure to set the default link. This will insure that when the user clicks a part of the figure which is not linked to another page, they will remain on the original page. Simply write your html document's name as the default.

You can save your work in two forms: client-side or server-side. In
a client-side image map, a map data is embedded in the host page. Clicks
are processed by the Web browser without interaction with the server. In
a standard server-side image map, clicks are processed by interaction with
the Web server. (Source)
The best way to go is to use the client-side. However, below is the procedure
for saving as both client-side and server-side.
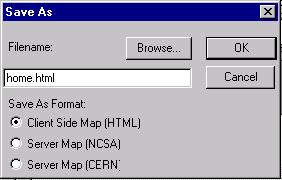
Your last step is to save your work. Select Save as under File. Select Sever Map (NCSA) as the format. Your file can then be saved as a .map extension. It is best to name your .map file the same as your html document or image. This will help you when you have several Clickable maps.

Once you have finished creating the Clickable object, open your source html file. Here is the syntax to be used:
<A HREF="home3.MAP"
<IMG ISMAP SRC="picture.gif" ALT="any text you want
to appear underneath the image</A
If you open you .map file in a text editor you will see the coordinates of your links:

You can also save your file as "client" based . To do so, simply click on client side map and name it the same as your original html document.

This will incorporate the .map file directly into your
.html. Obviously, this is the most simple way to go. If you open
your html source document, you will now see the following:
<IMG SRC="picture.gif" ALT="table fo contents"
usemap="#fpicture"</CENTER
<map name="picture"
<area shape="rect" alt="link to " coords="99,0
195,146 " href="class.htm"target="main"
<area shape="rect" coords="195,0 293,146 " href="resea.htm"
target="main"
<area shape="rect" coords="293,0 380,143" href="pub.htm"
target="main"
<area shape="rect" coords="381,0 469,148" href="visit.htm"
target="main"
<area shape="rect" coords="470,0 573,148 " href="hook.htm"
<area shape="rect" coords="2,0 98,142"href="stu.htm"
target="main"
</map
Note: you do not have to enter this code
as you did for the "server" based method. This code will be automatically
inputted into your .html document!!
Okay, you are done. If you want more help check out UT's
Web Publishing Page.
Many thanks to Carolyn
Nobel for her help for the "client" based components of this
exercise.